english girl at home

A Sewing & Knitting Blog, Made in Birmingham, England


2 Comments

Belted Sweater in Liberty Sweatshirting

Digital Pattern Library Liberty Belted Sweater

Pattern: Belted Sweater by Digital Pattern Library

Sewing time taken (excluding cutting out): 3.5 hours

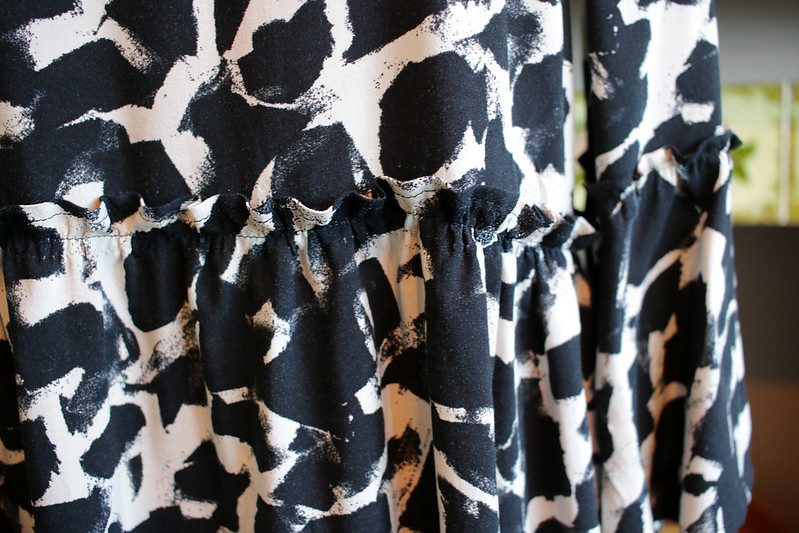
Fabric: Liberty sweatshirting from Birmingham Rag Market (The Little World of Fabric, also known as ‘The Liberty Man’)

Digital Pattern Library Liberty Belted Sweater

I hope everyone who celebrates it had a good Christmas. I’ve had a couple of quiet days in the house following spending Christmas and Boxing Day with family, and a couple of busy weeks in the run up. I spent the days immediately before Christmas focused on sewing a couple of gifts (using Noodlehead’s Forage Bag pattern) and hastily sewing a new dress in a day (Trend Patterns’ 70s Dress). I finished the dress just in time to wear it on Christmas Day (with a spot of hand sewing on Christmas morning and my brother sewing me into the cuffs), but I rushed the last sections so they aren’t finished to a standard I’m happy with. I’m going to revisit the sections of the dress that I rushed, perhaps before New Year’s Eve so that I can wear the dress to a second party asap.

Digital Pattern Library Liberty Belted Sweater

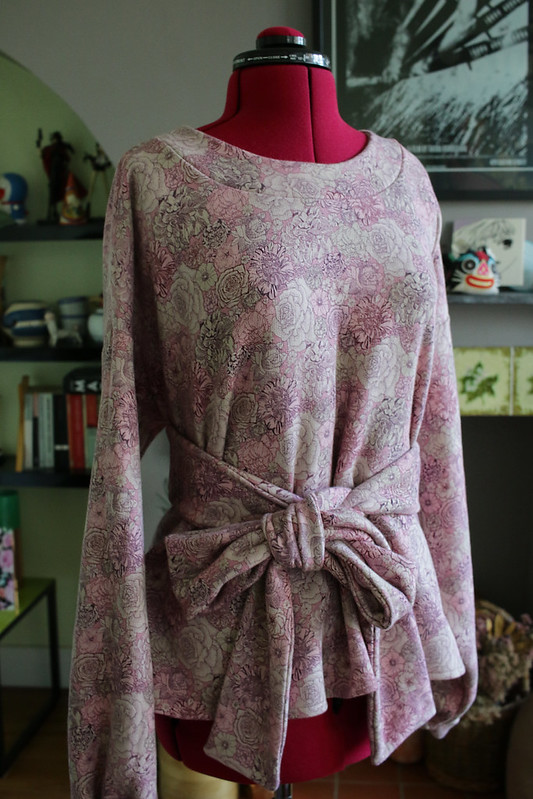
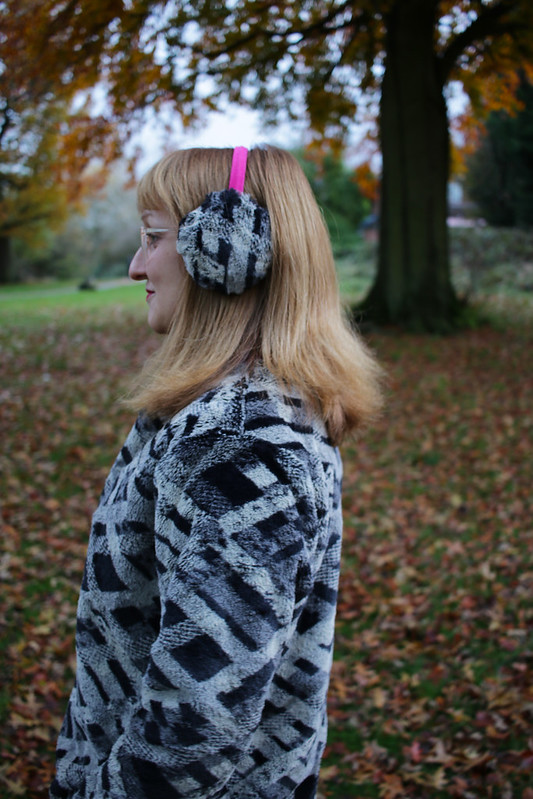
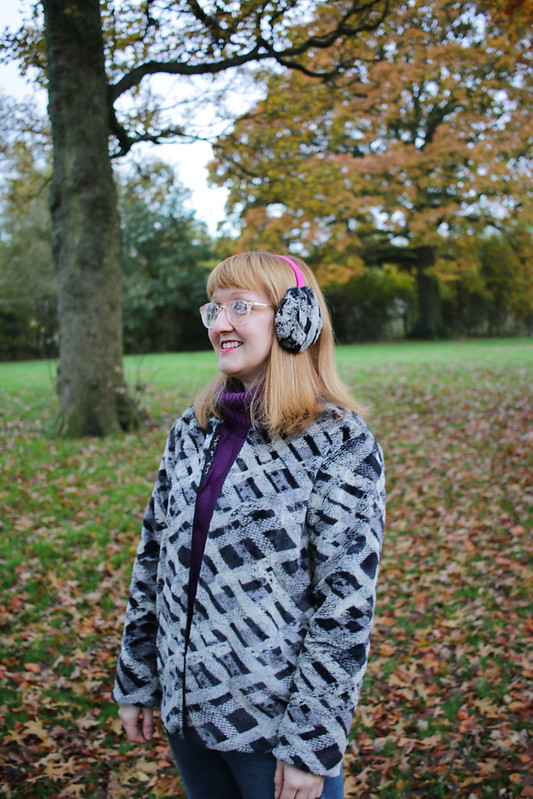
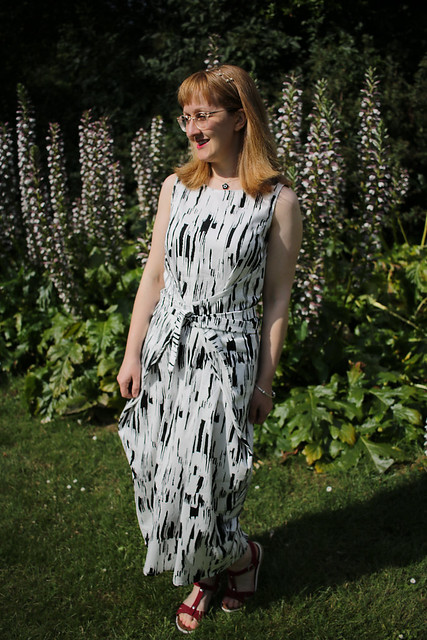
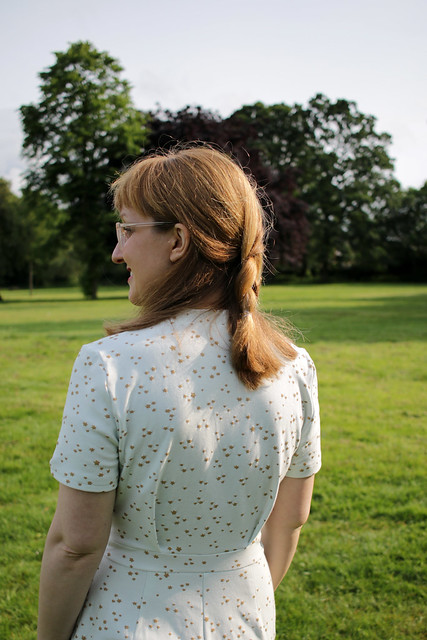
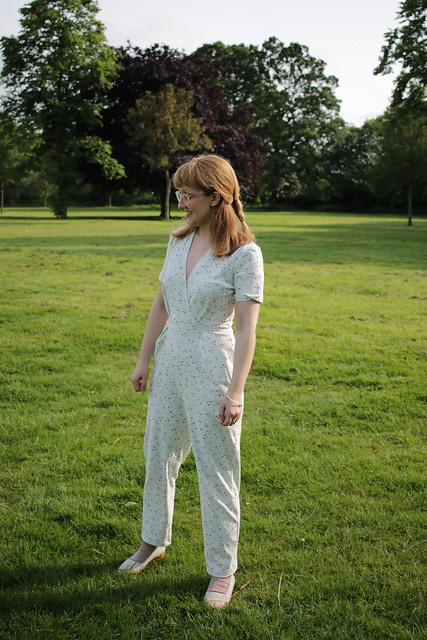
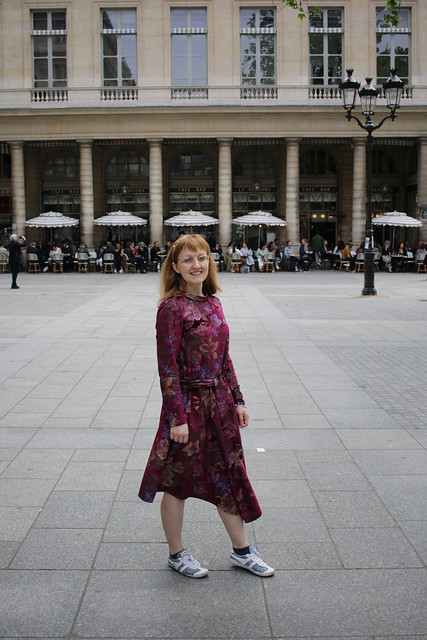
These pictures were taken a few days before Christmas, in the local park on the way home from some last-minute present shopping. This is my second version of the Belted Sweater by Digital Pattern Library, sewn in a Liberty sweatshirting bought during this year’s SewBrum meet-up from the ‘Liberty Man’ in the Rag Market (also known as The Little World of Fabric on Ebay).

Digital Pattern Library Liberty Belted Sweater

After making my first Belted Sweater in a lightweight knit, I was keen to try it in a heavier-weight fabric. I spotted this Liberty fabric at a bargain price (I think I paid £20 in total) during SewBrum and thought I’d try pairing it with the pattern. The resulting sweater is very cosy and I’m really enjoying wearing it. I think a slightly lighter weight sweatshirting would be more practical though (and is what I’d opt for next time) as this Liberty fabric is very thick and with the ties wrapped around the waist I’ve found that my slim fit RTW coat won’t do up over it! Luckily I’ve now finished the Yates coat I started a year ago which is roomy enough to fit this jumper under.

Digital Pattern Library Liberty Belted Sweater

I love how different this pattern can look dependent how the ties are done up, and you can create some lovely pleats and tucks in the fabric. I’m a big fan of a good sweatshirt pattern (evidence: the number of Lindens I have sewn) and I love that this pattern offers something a bit different. I requires a bit more fabric and a bit more time than a more ‘standard’ sweatshirt, but is an equally straightforward project to sew.

Digital Pattern Library Liberty Belted Sweater

My brother has been trying to get me into Stardew Valley for a few years (I’m a big fan of the Harvest Moon games) and has bought me the Switch version for Christmas, so I’m going to curl up on the sofa and start farming this evening. Have a great new year everyone and I’ll catch you in 2020!

Digital Pattern Library Liberty Belted Sweater Digital Pattern Library Liberty Belted Sweater Digital Pattern Library Liberty Belted Sweater


2 Comments

Tilly & the Buttons Indigo

Tilly & the Buttons Indigo Dress

Pattern: Indigo Dress by Tilly and the Buttons

Sewing time taken (excluding cutting out): 5 hours

Fabric: Gifted by Kate at The Sewing Weekender 2017

Tilly & the Buttons Indigo Dress

After a busy week and a rubbish election result, I decided to treat myself to a weekend at home. Apart from a couple of excursions out for sustenance – and to take these photos – I’ve stayed in the house, watched films, and sewn. It’s meant being able to finish a Yates coat for myself and getting back to the blog after a couple of weeks absence.

Tilly & the Buttons Indigo Dress

It was a bit chilly taking these photos in the local park, but I wanted to share my Tilly and the Buttons Indigo Dress – and the hairband I made to match it. I’ve been making good progress through both my unfinished-object pile, and my fabric stash, this year. This fabric was a piece which Kate (of The Fold Line) gifted to me at The Sewing Weekender in 2017, so it was really satisfying to sew with it and to be able to start wearing it at last.

Tilly & the Buttons Indigo Dress

My Indigo is graded between sizes 3 and 4, I made the dress length version and included all of the ruffles (although they aren’t easy to see in the pictures due to the business of the fabric). It’s such an easy and comfortable dress and I’m sure it will get lots of wear once the weather warms up again. I have to credit Joy, Amy & Marie‘s version of the Indigo in particular for tempting me to make my own.

Tilly & the Buttons Indigo Dress Tilly & the Buttons Indigo Dress

I wear headbands regularly, and decided to have a go at making one to match this dress using my fabric scraps. For the base of my headband I ordered wide plastic headband bases from Petershams Millinery Supplies. To cover the band I cut a rectangular strip of fabric, sewed it up as a tube and secured it around the band with a few stitches. I then made two more rectangular tubes, and attached them on top of the band to form a bow. It’s a really cheap and easy way to make a matching accessory and uses very little fabric. I’ll definitely be making more.

Tilly & the Buttons Indigo Dress

Now that my Yates coat is finished my next (sewing) priority is finishing a Carlton Coat for Phil which I started last year, and a dress for me to wear on Christmas Day which I cut out two years ago. If I can get those projects completed I will be starting 2020 with a very healthy (i.e. small) unfinished-objects basket, and loads of plans for working through more of my fabric stash in the new year. But first I’m going to go back to a weekend of films and relaxing on the sofa beside the Christmas tree.

Tilly & the Buttons Indigo Dress Tilly & the Buttons Indigo Dress


2 Comments

Faux Fur Tamarack

Faux Fur Grainline Studio Tamarack Jacket

Pattern: Tamarack Jacket by Grainline Studio

Sewing time taken (excluding cutting out): 4 hours

Fabric: Faux fur from Samuel Taylors / Sew Up North 2018

Faux Fur Grainline Studio Tamarack Jacket

This faux fur Grainline Studio Tamarack Jacket was a long time coming. I first decided to make a Tamarack in faux fur in November 2015, after seeing a RTW faux fur jacket in a similar shape. It then took me until 2018 to spot a faux fur fabric I liked enough to buy it – in Samuel Taylors, Leeds during the 2018 Sew Up North meet-up.

Faux Fur Grainline Studio Tamarack Jacket

I cut out all of the pattern pieces for this jacket (including interfacing and lining) last winter but didn’t find the time to sew it. A few weeks ago I plucked the pattern pieces out of my unfinished objects basket and after around four hours sewing time I finally had a finished jacket. Further evidence that sewing only makes up a small part of many sewing projects!

Faux Fur Grainline Studio Tamarack Jacket

Despite having planned this jacket since 2015, the high street is full of faux fur jackets in similar styles this winter, so it feels very on-trend. I had fabric left over after finishing the jacket (I still do, but I’m not sure I need any more matching accessories) so I decided to make matching earmuffs, by covering a pair I already owned. I cut two circles of fabric to cover each ear, sewed them right-sides together and pulled them over each side of the ear muffs, finally I hand-sewed the top of each side closed around the headband.

Faux Fur Grainline Studio Tamarack Jacket

For the jacket, I didn’t want to finish the edges with bias binding – as per the pattern instructions – as I thought it would flatten the faux fur. Instead I cut a lining (using the standard pattern pieces with a slightly trimmed seam allowance to prevent the lining peeking out) and sewed the main and lining jackets together at all seams except the centre front. The lining fabric is a Liberty cotton lawn bought from Birmingham Rag Market (specifically The Little World of Fabric, also known as ‘The Liberty Man’).

Faux Fur Grainline Studio Tamarack Jacket

I fancied a zip closure (see also: Meg and Katie’s versions with zips) but was a bit worried about the faux fur getting caught in the zipper teeth. In the end I decided to go for it, and fitted a 22″ zip (a 21″ zip would have been preferable but they didn’t have that in the shop). I attached the zip with a generous seam allowance to give it a little distance from the faux fur and I haven’t had any issues with the fabric getting caught.

Faux Fur Grainline Studio Tamarack Jacket

The Tamarack pattern is a great simple shape for hacking and I’ve been wearing this version loads since finishing it so I’m glad I finally brought it to fruition!

Faux Fur Grainline Studio Tamarack Jacket


1 Comment

Constellation Double Gauze Myosotis

Deer & Doe Myosotis Dress in Kokka Double Gauze

I’m finally blogging my Deer and Doe Myosotis Dress which I made back in April, ready to wear for the Paris Sewcial / Paris Coud meet-up.

Deer & Doe Myosotis Dress in Kokka Double Gauze

I loved the Myosotis pattern when it was released, but it was when I saw the fabric that the idea of this dress got lodged in my brain and wouldn’t leave me in peace until it was realised. The fabric is a double gauze by the Japanese brand Kokka, and is embroidered with astrological designs. I originally saw the fabric on Guthrie & Ghani’s instagram feed in an alternative colourway, but by the time I had bitten the bullet and made the decision to order it they were out of stock. It was relatively difficult to track down, but I found this white colourway available from Miss Matatabi and put in an order quick before they ran out too. With the dress already fully formed in my mind, I picked out matching pearlescent buttons during Male Pattern Boldness Day in New York in March.

Deer & Doe Myosotis Dress in Kokka Double Gauze

I made View A, with all possible ruffles, in size 34/36 (grading between sizes at the waist). As per my last blog post, I was clearly inspired by / copied the product image for version A, which is also made in a white cotton fabric. During construction I should have taken more care to stabilise my fabric on the long curved front bodice pieces, because when I initially got to the point of sewing the bodice together I found that the delicate double gauze fabric had stretched and the bodice wouldn’t lie flat. Luckily I had enough fabric left to recut the bodice, and second time around I underlined the bodice pieces in a plain white cotton, making the bodice much more stable, easier to sew and opaque.

Deer & Doe Myosotis Dress in Kokka Double Gauze

A white cotton Myosotis might seem destined for spring and summer, but I think it looks suitably autumnal in these pictures, paired with some wintery tights, boots and a hat. As it happens, these photos were actually taken during the summer, in June, while on a family holiday to the Peak District. I packed a suitcase full of new summery me-made garments having not checked the weather forecast, and spent the whole week pairing them with boots and a coat.

Deer & Doe Myosotis Dress in Kokka Double Gauze

With the three sewing events I’ve been involved in organising this year (Paris Sewcial, The Sewing Weekender, and SewBrum) over for another year (at least) I’m hoping to catch-up with posting a few other sewing and knitting projects from this year which are yet to make it to the blog. I’ve also set myself the goal of knitting a Halloween-themed jumper before the end of the month (wish me luck, I knit multiple gauge swatches, none of which were right, and in the end just went with the recommended needle size). After that it will be time to think about Christmas present making – and finishing the coat for Phil which I started last winter and abandoned in March!

Deer & Doe Myosotis Dress in Kokka Double Gauze

Deer & Doe Myosotis Dress in Kokka Double Gauze

Deer & Doe Myosotis Dress in Kokka Double Gauze


Leave a comment

CocoWawa Crafts Raspberry Jumpsuit

CocoWawa Raspberry Jumpsuit

I love Ana of CocoWawa Crafts‘ patterns – especially the Honeycomb – and I own quite a few of them, but I hadn’t gotten around to sewing any of them until this summer. When Ana released the Raspberry Jumpsuit I decided it was time to put that right, and to have a go at sewing my first shirred bodice at the same time.

CocoWawa Raspberry Jumpsuit

I made the Jumpsuit version, in View 3, with has a metal hoop detail on the straps. I didn’t have any hoops to hand at the recommended size so used some small hoops intended for lingerie-making. I actually like the smaller hoop for a more subtle strap detail.

CocoWawa Raspberry Jumpsuit

I made a few minor tweaks to the pattern. I crossed the straps at the back for visual interest, and I added a belt and thread loops at the waist as I’m not keen on visible waist seams. Size wise I graded between a 10 and 12, but could have gotten away with a straight size 10 given the loose style of the design and the leeway provided by the shirred bodice.

CocoWawa Raspberry Jumpsuit

I hadn’t realised until now, but the colour of my fabric is very similar to Ana’s sample image for this version of the pattern. No doubt I was subconsciously drawn to this fabric in my stash for that reason. My fabric was purchased from Birmingham Rag Market a year ago, and cost £1.50 per metre. This project was another lesson in no longer sewing with cheap fabric, as the trousers started to pill where my handbag rubbed against them after a few wears. After I constructed the jumpsuit I realised that the trousers were too translucent to be decent (but not the bodice due to the shirring), so I cut a second pair, shortened to knee-length shorts, and attached them inside the trousers at the waist seam.

CocoWawa Raspberry Jumpsuit

The shirred bodice is easy to sew and comfortable to wear. The pattern recommends purchasing 6 spools of shirring elastic, but I think I only used one (perhaps two at a push) and I don’t think my bodice is particularly loose, although perhaps it could have been a bit tighter just above the waist seam as you can see some movement of the fabric in these pictures.

CocoWawa Raspberry Jumpsuit

Expect a few more summer sewing projects from me as I catch up with the backlog of photos I pestered Phil to take while we were on holiday during August, and earlier this year. A week or two of rain and colder weather has however had an impact on my sewing plans, as coat and jacket patterns are suddenly looking much more exciting. I’m thinking of starting a jacket for myself with a pattern from the August issue of Burda, and of finally finishing the coat for Phil which I abandoned in March. You can guess which of the two is the most enticing, but hopefully I’ll get to both before too long.

CocoWawa Raspberry Jumpsuit


5 Comments

Pilatus Swimsuit on Holiday

Opian Pilatus Swimsuit in Liberty fabric

Pattern: Opian Pilatus

Time taken (excluding cutting out): 6 hours

Fabric: Liberty ‘Santa Monica Brighton Swim Regenerated Nylon’

Opian Pilatus Swimsuit in Liberty fabric

August and September have been a busy couple of months for me with a week’s weaving course, The Sewing Weekender, jeans making and ply split braiding workshops, and a holiday to Croatia. Today I’m finally having a quiet Saturday at home with time for video gaming (I bought myself Untitled Goose Game this morning), blogging, and – later on with any luck – some sewing. I might make a start on the Alice & Co Mary Quant-inspired Georgie Dress if I have a suitable fabric in my stash.

Opian Pilatus Swimsuit in Liberty fabric

After my weaving course and the Sewing Weekender, Phil suggested that perhaps we should go on holiday together for a change! I put in a request for somewhere sunny and near the sea as I fancied another go at sewing a swimsuit, specifically the Opian Pilatus sewing pattern.

Opian Pilatus Swimsuit in Liberty fabric

My Pilatus was inspired by the lovely versions by Katie and Linda in particular. I love the cut-outs, the high waist and that front tie. It is a really straightforward pattern to put together – the bodice is self-lined meaning that it’s not even necessary to attach elastic in the top, just at the edges of the bottoms. Following a couple of projects which seemed to take forever (but probably didn’t, just lots of short sewing sessions) I’ve started timing how long my sewing projects are taking for my own interest. Excluding cutting out, this project took me six hours, which I think is pretty reasonable for a swimsuit.

Opian Pilatus Swimsuit in Liberty fabric

This is the second swimsuit I have sewn, following a Bombshell Swimsuit in 2014. My sewing skills have increased enormously since 2014 (I only started garment sewing in earnest in 2013) – as have my blog pictures, check out those original Bombshell swimsuit pics in the garden. My Bombshell turned out perfectly wearable, and I still wear it, but I did struggle with getting a good fit. This time around I found swimsuit sewing straightforward. I cut a size 2/4, grading between sizes at the waist, with no changes to the pattern.

Opian Pilatus Swimsuit in Liberty fabric

The fabric is a Liberty swim-suiting fabric in print ‘Santa Monica’ and fabric type ‘Brighton Swim’. I bought it in a half-price sale (it’s still available if you’re quick) from the Liberty website. I’m really impressed by the quality of the fabric, it’s opaque, a good weight, and dries quickly once out of the water. The fabric I used for my Bombshell wasn’t really a swimsuiting fabric – I think it was probably intended for leotards or dance costumes. It works ok for a swimsuit but it takes ages to dry. This Liberty fabric feels so professional in comparison, which makes a huge difference to making my Pilatus feel well made.

Opian Pilatus Swimsuit in Liberty fabric

Excuse the number of pictures. I wore this swimsuit in Croatia to swim in the hotel pool, the ocean, and a salt lake on Lokrum Island. All of the locations were so beautiful that I couldn’t resist requesting a few more pictures (from Phil) each time.

Opian Pilatus Swimsuit in Liberty fabric


1 Comment

Woven Kielo

Named Kielo Wrap Dress in Cotton Sateen from Minerva Crafts

I’ve had more time to sew recently as a result of both having a more relaxed job, and Phil starting an online undergraduate degree (in computer science) which is keeping him busy most evenings. Once Phil is settled down to study I’m turning to my sewing projects in the evenings much more often than I have previously, as opposed to watching Father Ted/Red Dwarf/Blackadder on repeat, which is what usually happens when we both have a free evening.

Named Kielo Wrap Dress in Cotton Sateen from Minerva Crafts

With my additional sewing time, I’ve made some of those new release patterns which take the sewing community by storm and have to be started immediately, and I’ve also made some of those patterns which have been on my to-sew list for years, including the Kielo wrap dress which has been on my list since it was first released back in 2014.

Named Kielo Wrap Dress in Cotton Sateen from Minerva Crafts

The particular motivation to get on with finally trying out the Kielo pattern was the offer of this cream and black Stretch Cotton Sateen Fabric from Minerva Crafts as part of their Maker Team. I remember the launch of their Blogger Network well so it was fun to contribute my first post, which is now live here. I actually managed to write about the construction of the dress, rather than my normal blog waffling (as evidenced here), so check out the MC blog for actual construction details.

Named Kielo Wrap Dress in Cotton Sateen from Minerva Crafts

The fabric is a medium weight woven which emphasises the silhouette of the Kielo in a way I really like, although it needs a short jacket in cooler weather as paired with a longer one the silhouette looks a bit frumpy. After waiting 5 years to try the Kielo (and given that it took all of two evenings to sew) I think that another version at least is called for, and I’m keen to try the pattern in a lightweight knit for a different silhouette. I cut a straight size 10, reduced the length (by 9 inches) and consequently increased the height of the vent.

Named Kielo Wrap Dress in Cotton Sateen from Minerva Crafts

These photos were taken during a recent trip to London after Phil won two free tickets to see The Who at Wembly Stadium! I’m well aware of the many ways I am lucky, but lately I’ve been lucky in the competition-winning sense. Long may it continue!

Named Kielo Wrap Dress in Cotton Sateen from Minerva Crafts


2 Comments

Starry Sirocco Jumpsuit

Deer and Doe Sirocco Jumpsuit

I’ve been getting lots of time for sewing recently, which means I have been trying patterns quite soon after their release rather than a year or so later, as is my usual habit.

Deer and Doe Sirocco Jumpsuit

That includes having sewn two Deer and Doe Sirocco Jumpsuits since the release of the pattern in April. The jumpsuit pictured is my second Sirocco. I made both my Siroccos in fabric purchased during the Paris Sewcial meet-up from Bennytex fabric warehouse on the outskirts of Paris.

Deer and Doe Sirocco Jumpsuit

I made the first Sirocco in a lightweight grey knit fabric grading between sizes 38/40. After a couple of wears I decided that the crotch was too low for me to be comfortable wearing the jumpsuit, so for my second version I still cut a size 38/40 except for the seams at the top of the trousers and bottom of the bodice, where I graded down to size 34 (the smallest size in the pattern). This worked perfectly to raise the crotch without impacting the construction of the pattern (including attaching the pockets to the trousers at the waist seam which I was worried would be affected by a more major alteration). I want to go back and make the same alteration to my original Sirocco in time to get lots of wear out of it this summer.

Deer and Doe Sirocco Jumpsuit

This second version was made in a medium weight knit fabric with a gold stars print. This is a sweat-shirting-type fabric, with a soft wrong-side. I really like this jumpsuit in a slightly weightier fabric, and I’m loving white clothes this summer. I suspect this fabric might get marked or start pilling relatively quickly, but I’m going to make the most of wearing it for as long as I can.

Deer and Doe Sirocco Jumpsuit

These pictures are a mixture of photos taken in our local park, and pictures taken during a family holiday to Derbyshire, including to visit a nearby well dressing in Cressbrook, inspired by a visit by Karen a few days before.

Deer and Doe Sirocco Jumpsuit

I always associate holidays with taking lots of nice blog photos. I filled my suitcase with summery clothes I wanted to photograph – and then it was wet and cold all week. We still managed some nice pictures between showers, and the summery outfits worked out fine for exploring Derbyshire paired with some boots, a jacket and an umbrella. We even managed a brief dip in the outside pool in Hathersage while we were there.

Deer and Doe Sirocco Jumpsuit

I’ll leave you with the obligatory jumping in a jumpsuit picture as I return to binge watching series 17 of Project Runway with a final cup of tea before bed.

Deer and Doe Sirocco Jumpsuit


4 Comments

Maven Patterns Rochester Dress at the Confetti Fields

Maven Patterns Rochester Dress

Recently, my mom told me about the Confetti Fields in Pershore, part of a farm which grows and sells dried flower petal confetti. For 10 days each year some of the fields are open to the public, and they have pop-up stalls selling cake and tea, and bouquets of the flowers. Clearly this was an irresistible blog photo opportunity, so when my mom and dad visited last weekend, me and Phil tagged along.

Maven Patterns Rochester Dress

In my enthusiasm to visit the fields I didn’t actually stop to think that Phil – who has severe hay fever – might not be so keen to walk through fields full of flowers, until he reminded me. He did get severe hay fever and it was not his favourite place, but he still took some rather nice photos of my new dress in between sneezes.

Maven Patterns Rochester Dress

This is the Rochester Dress from Maven Patterns. I bought the pattern direct from Maven Patterns at the Sewing for Pleasure show at Birmingham NEC in March, and picked this fabric to make it with, also at the show, from Higgs & Higgs. The fabric was in the bargain bin and was a total steal, I assume it’s a cotton but it has a linen-like ability to wrinkle seemingly two seconds after emerging from under the iron.

Maven Patterns Rochester Dress

The Rochester is a deceptively simple pattern, as it actually has a number of carefully designed details. I was assuming I would whip this dress up, but following the instructions and taking my time to sew neatly (I’m getting really good at actually taking care with my sewing now!), it took a couple of longish sittings.

Maven Patterns Rochester Dress

The first of the interesting features of the dress is the long curved hem, with side split and modest high-low hem. In addition to hem facing pieces, the pattern includes a template for top-stitching the hem, which I used and which resulted in very neat top stitching if I do say so myself. The pattern also intends for the sleeves to be finished with top stitching, and it looks great on the pattern but I couldn’t see any way to top stitch after the sleeves had been constructed with my fabric / machine, as I couldn’t easily have reached that far up the sleeve with the machine. I slip stitched my sleeve facing by hand, but the effect isn’t as interesting as the intended top stitching.

Maven Patterns Rochester Dress

The other main feature of the dress is the neckline. There are two neckline options included in the pattern, and I had intended to use the alternative (which is a simpler single row of elastic directly at the neckline) due to loving the effect on the pattern cover. I decided, however, that I ought to try the more unusual option and I’m really pleased with the result, which was very easy to achieve with a couple of rows of stitching and a small off-cut of elastic. There’s also a pleat at the back of the dress although it’s not very well shown off in these photos, or in this crease-loving fabric.

Maven Patterns Rochester Dress

I’d definitely like to make another Rochester dress in a crepe or viscose at some point, and I do think the details of this dress would be shown off to great effect in a solid colour.

Maven Patterns Rochester Dress

I’m really glad that I finally got around to sewing one of the Maven Patterns. I’ve seen some beautiful versions of the French Dart Pattern (including Susan Young’s) so that might be the next pattern I try, and I also fancy making myself an apron I’m happy to wear out to workshops (i.e. one which isn’t covered in stains from years of wear in the kitchen) using their Maria Apron pattern.

Maven Patterns Rochester Dress


1 Comment

Velvet Floral Floreat Dress

Megan Nielsen Floreat Dress

Me and Phil are back at home this weekend after a few days holiday with family in the Peak District. We had a fun few days but one thing I am glad to return home to is decent Wi-Fi! I spent hours yesterday catching up with emails, and thought this evening would be the perfect opportunity to write a blog post. I have also left the house a few times in between, and finished a small embroidery project, so the weekend hasn’t been solely spent in front of a screen.

Megan Nielsen Floreat Dress

I managed to dodge the rain long enough to get some photos of recent makes while we were away, but the photos here predate the most recent holiday, and were mostly taken in Paris when we were there for #ParisSewcial.

Megan Nielsen Floreat Dress

This pattern is the Floreat Dress from Megan Nielsen. The pattern includes a whole host of variations and I was especially drawn to the knit dress version, so made my floreat in this stretch floral velvet from Like Sew Amazing which I purchased with a voucher I was kindly gifted by Sarah for second prize in the Refashioners 2018. I love a velvet, and this is quite an unusual fabric as the florals are smooth and shiny, with velvet in-between.

Megan Nielsen Floreat Dress

I didn’t love this dress as much as I expected on completion. After a couple of wears I have determined that the long length, long sleeves, and busy fabric combine to feel a bit overwhelming. Lately I have committed to making sure that I love (and wear) all of the garments in my wardrobe – and I have been altering (or giving away) those I’m not happy with. I worked through a good chunk of my alterations pile during Me-Made-May, and am planning to keep up the momentum now May is over. For this dress, I’ve trimmed the sleeves to a short length and I have a feeling that the new and improved version will be in regular rotation in my wardrobe.

Megan Nielsen Floreat Dress