english girl at home

A Sewing & Knitting Blog, Made in Birmingham, England


4 Comments

#SewSolidarity – Sashiko Style Stitches on a Denim Skirt

“Cleaning, caring and mending seem like nothing more than good manners when you think about the endeavour that has gone into constructing even the most simple of pieces” – Lucy Siegle, ‘To Die For: Is Fashion Wearing Out the World?’

For #SewSolidarity, and in advance of Fashion Revolution Day tomorrow, I customised this RTW Gap skirt.

Customised Denim Skirt with Sashiko Style Stitches

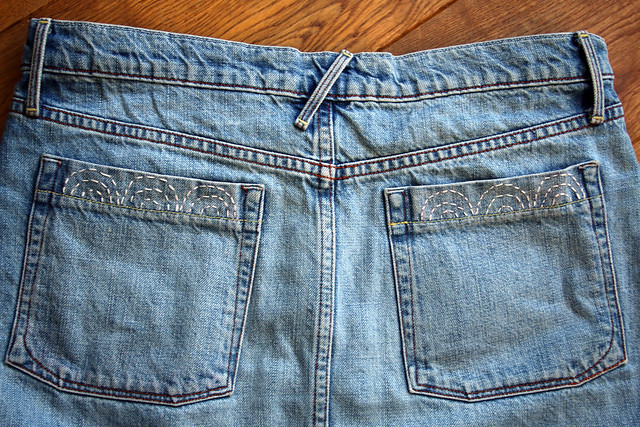
I bought the skirt in a local charity shop while browsing on my lunch break. The skirt was still in good condition and a pretty good fit with the addition of a belt, so I decided not to drastically alter it.

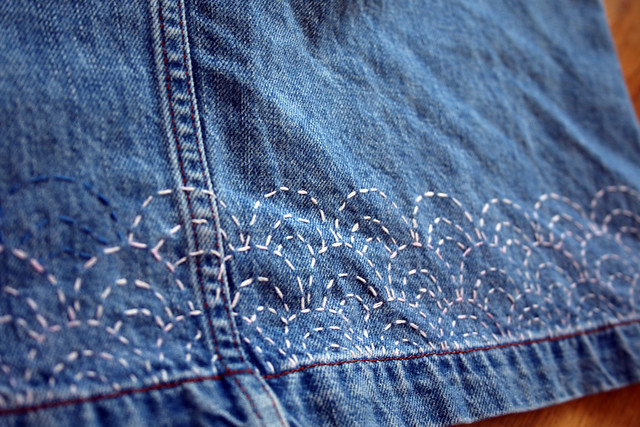
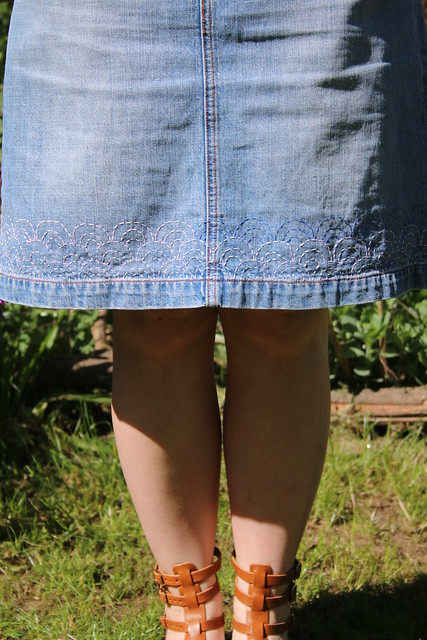
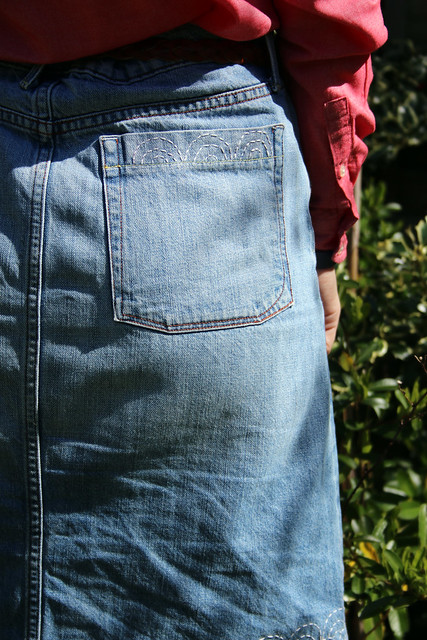
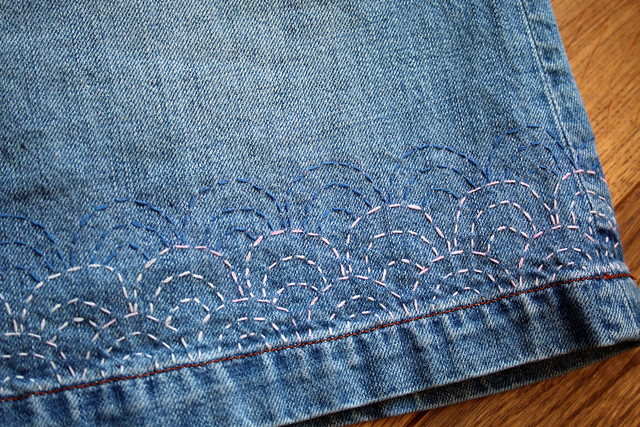
Instead, I decided to embellish the skirt with some sashiko-style stitches. I used white and blue embroidery thread, as opposed to sashiko thread, as I already had some in my stash. I adopted a circular pattern on the hem of the skirt and the tops of the back pockets, and a small cross pattern on one of the front pockets.

Customised Denim Skirt with Sashiko Style Stitches

As in the Lucy Siegle quote above, we have a tendency – because RTW clothes are so cheap – to treat them as highly disposable. But, despite being cheap, a huge amount of effort goes into producing any garment. I’m trying to adopt more of a make do and mend approach to my own clothing to put that effort to best use.

I also like being able to apply a slow sewing technique (hand stitching) to a garment that would have originally have been produced very quickly. In this instance by garment workers in Turkey.

How are you guys planning to participate in Fashion Revolution Day? Ever tried sashiko?

Customised Denim Skirt with Sashiko Style Stitches

Customised Denim Skirt with Sashiko Style Stitches

Customised Denim Skirt with Sashiko Style Stitches

Customised Denim Skirt with Sashiko Style Stitches


Leave a comment

What (Not) to Watch While Crafting

I tend to do quite a bit of making with the TV on. It actually makes me a lot slower, but it does allow me to feel as if I’m multi-tasking (sort-of) and allows me to work through a few things I’ve recorded before the Sky box gets full!

However, there are certain types of movies/TV shows which don’t allow multi-tasking. You have to give them 100% concentration if you want to enjoy them. When deciding what to watch while crafting I follow the following simple rules:

What Not to Watch

  • Slapstick comedies (you’ll miss all the best jokes looking down to thread a needle)
  • Silent movies (you’ll have no idea what is going on)
  • Foreign-language movies/TV shows (you’ll drive your partner mad asking them to read you the subtitles while you finish a tricky section)
  • Natural history (you won’t appreciate the amazing photography)
  • Animation (this one is borderline as it can be done but you’re not really getting the full benefit if you’re only looking at the screen 50% of the time)

Chaplin painting

What to Watch

Anything else is acceptable, however the following are particularly recommended:

  • Crafty shows (good for inspiration. In particular I’d recommend Next Great Artist, but at the moment I’m enjoying Great British Sewing Bee)
  • Shows your partner loves but you think are only so-so (only deserving of 50% concentration anyway, plus you’ll win some brownie points)
  • Wordy shows with less than amazing visuals (e.g. history shows, some documentaries)

And of course you could always just listen to the radio…


Leave a comment

Basket Weaving

Handmade Willow Basket

Yesterday I attended a willow weaving course at Winterbourne, an Edwardian house museum in Birmingham. The course was led by Jonathan Ridgeon whose website features an article with instructions to make a basket very similar to the one I made, which is pictured here.

To achieve the two-tone effect we used a combination of willow without bark (the paler colour you can see on the base and edges of my basket) and with bark (the green colour used on the sides and handle of the basket).

I’d like another go as it took me a little while to get the hang of weaving so the base of the basket is a bit wonky, but It didn’t turn out too bad for a first attempt.

Handmade Willow Basket


Leave a comment

Purple Felt Hair

I made the little doll below with the intention of selling her at the craft fair me and colleagues held a couple of weeks ago. However, she went unsold so she’s come home with me. She’s pictured below sat in our living room. She doesn’t have a mouth as I ran out of time to add one before the craft fair -however, I’ve decided to leave her like that as I think she looks quite cute without one. As you can see, she has purple felt hair and her dress is made with a lovely fabric I picked up cheaply at a market in the French town of Le Bugue, which I visited with my family this summer.

Handmade fabric doll


1 Comment

Customised button badge felt brooches

Last year, me and Phil visited Tallinn in Estonia. While there I bought a selection of retro button badges with the intention of doing something with them.

Making button badge brooches

This week I finally got around to it, creating some felt brooches with the vintage button badges at the centre. I’ll be selling these at the charity craft fair me and colleagues are currently organising for August.

Making button badge brooches

These were really easy to make. If your interested in giving it a try instructions are provided below:

1. Cut seven felt circles a bit larger than the button badge and the size you want to brooch to be. I used two colours of felt for my brooches – with 4 felt circles in the colour that was also used to back the brooch & 2 circles in a contrasting colour.

Making button badge brooches

2. Select one of your felt circles as the base of the brooch and sew four of the circles to the front of this to form the four quadrants or quarters of the circular brooch. To do this you’ll need to fold the circles being attached in half and then half again. I attached these to the front of the brooch with a few stitches but you could also use glue.

Making button badge brooches

3. In order to make your brooch sturdy cut a circle of cardboard slightly smaller than your felt circles, so that it won’t be visible once the brooch is assembled, and glue this to the reverse of your brooch.

4. Sew a badge back accessory to the remaining sixth felt circle and glue this on top of the cardboard circle you have just attached. I tided the edge of the two back pieces and ensured the cardboard wouldn’t be visible by sewing around the edge of the two back pieces with blanket stitch.

Making button badge brooches

Making button badge brooches

5. Finally attach your button badge to the front of the brooch. You could just pin it on or, for extra stability, attach with glue.

Making button badge brooches


Leave a comment

Fireplace DIY

While I’m crafting Phil likes to do DIY. This is one of his recent jobs – tiling our dining room fireplace. The surround was in the house when we moved in and I think it’s the original 1930s surround, but I’ve since sanded it down and varnished it. The tiles also appeared to be original but they were dated & cracked so we decided to rip them out & replace them with red and white.

Red and white tiled fireplace

Red and white tiled fireplace

Red and white tiled fireplace